Month Five: Wedding Planning with Maddie
This is the seventh post in a new series about me, a professional wedding planner, planning my own wedding. If you’ve been following along on the blog, or on Instagram, you know that back in March, I got engaged to the most amazing man that I know! It has been a very busy and exciting last few months. With three years of experience, you would think planning my own wedding would be a breeze. Up until now wedding planning has been dreaming, romanticizing, and even manifesting our wedding. Once we hit that 2 month mark till our wedding, it stopped being a dream and became a reality. I’m going to be honest with y’all the last two months is when it started getting hard. Not only did we move and start new jobs, but during this time I have been commuting to and from Arkansas almost every weekend to complete our wedding planning to do list. I also started a lot of DIY projects that have begun to take up a lot of my time. I really started to feel like things were going too quickly and the to-do list was way too long. Here are a few things we did this month to tackle that to do list in the final months leading up to our wedding:

Send Invitations
I’m going to be completely honest with you guys on this one. We waited way too long to send out our invitations. Not only do I have my other clients who need to take priority, but we have a lot of guests who moved this summer. Either they just graduated college and moved on to new things, or they are still a college student and move every summer. With that being said, collecting everyone’s current addresses was an absolute nightmare for us. At the end of the day I said, “Screw it, we are sending out the invitations that we have addresses for today. The rest can wait.” After sending the bulk of our invitations out, I spent the next week sending out all of our remaining invitations to guests when they sent us their new addresses.
I knew from day 1 that I wanted our wedding invitations to be a little extra. I loved the look of the transparent vellum sleeves and wraps that I had seen all over Instagram on luxury invitations. So I did what I do best, I went shopping on Amazon for a wedding hack. I ordered the vellum wraps on Amazon here and they were the perfect size to fit our invitations we ordered from Minted. All we had to do was fold them around the invitation and details cards. While this may seem like a really unnecessary step, it was a simple way to elevate our invitations without spending a thousand dollars on a custom design.

I also knew that I wanted to incorporate a wax seal into our invitations. For the wax seals I ordered a wax seal gun, green wax sticks, and a custom seal with our wedding crest on it from Artisaire. This was another creative way we were able to customize our invitations. Buying the wax, and stamping our own seals was definitely a learning experience for me. I have done a few wax seals before, but I have never tried making 100 of them in one sitting. You can buy pre-stamped seals, but making them myself was something I really wanted to do.
When it came to placing the wax seals, I decided to use them as the closure for the vellum wrap rather than the envelope itself. USPS charges extra postage when you use a wax seal on the outside of the envelope. By placing our wax seals on the vellum inside of the envelope we were able to class up our invitations without having to pay the extra postage.
I had a lot of fun assembling these invitations with my mom on one of my weekends in Arkansas. Once they were assembled, they looked exactly the way I had envisioned too! Many people sent pictures, texted, and even called me when they received their invitations, complimenting them. All in all, I’d say the extra details we added to our Minted invitations were worth our time.

Our RSVP form on our Wedding Website
Wedding Website & RSVP Tracking
I actually created our wedding website the weekend we got engaged. Remember how Nick proposed back in March on our Spring Break trip to Colorado? Well I was so excited about getting engaged that I spent the whole car ride back creating our wedding website, starting our registry on Zola, and planning our Engagement Party. While we used Zola for our wedding registry, I didn’t want to use any of the online wedding website generators. I already have a website for my wedding planning business and had a lot of fun designing it. I used my website to create a custom landing page for our guests to find our wedding details.
On our website I included, our names, the wedding date, our hashtag #plottwistwerethesoderquists, a summary of our love story from meeting in Jr. High School to the proposal, the address of our venue with google maps directions, our dress code, plus one policy, child policy, important times, and our Zola registry. It wasn’t until after we sent our invitations out that I provided our guests with a way to RSVP on our website.
Tracking RSVPs is not a fun task. It’s honestly just a waiting game. Some of our guests jumped right on the train and RSVP’d the minute they received their invitations. I’d say that was about 10% of our guests. Next, there were the family members and extended family members who didn’t think they needed to RSVP because they assumed we’d know they were coming. Then, there are the people who got the invitation, opened them, and completely ignored the detail cards. When asked they had no idea how to RSVP or that they even had to. Finally, the last group of people were the ones who knew they could not come to the wedding, but thought RSVPing is only for guests who are attending.
About 3 weeks after sending out our invitations, RSVP’s had come to an almost complete stop. We combatted this issue by sending all of our remaining guests an email. In this email we said how excited we are for our wedding and how we hope to see them at our wedding. We also gave instructions on how to RSVP and how to RSVP even if you are not coming to the wedding. This encouraged a second wave of RSVPs both yes and no from our guests and we were able to get a better idea of our final guest count by the end of the day. We still have a few guests who are still on the fence, and I plan to send another email out a week before our RSVP deadline letting them know that RSVPs will be closing and this is their last chance to let us know if they are coming or not. This has been really helpful for both us and our guests who just needed a reminder. If you haven't yet, I highly recommend collecting all of your guests lists emails for situations such as this.

Bible Guestbook Inspo

Paddle Guestbook Inspo
Guest Books
When it came time to pick out our guestbook, I was honestly hesitant about even getting one. I know so many of my couples buy a basic blank wedding guest book, only about a third of the guests sign it, and they end up with a few pages of signatures that they never look back at. I was not interested in having a guestbook if that was the only option. So of course I consulted one of my best friends, Pinterest. There have been a lot of creative guest “book” options out there recently. I say guest “book” because a lot of these really unique ideas are not actual books at all. They are framed photos of the couple, a piece of framed artwork, a large letter with the couple’s last name on it, a vinyl record, or a photo album. The list goes on. There were a few options that caught my eye.
Nick and I both grew up in Christian households and even participated in the same college ministry, so when I saw journaling bibles where guests can mark their favorite bible verse or leave a message in the margins, I loved the idea. Nick, however, brought up a good point. Not all of our guests are religious, and we would hate to leave someone out if they don’t feel comfortable leaving a message for us in our bible. We are still having the journaling bible at our wedding, but we wanted a second option to be more inclusive for our guests. Again I didn't want something that would get put on a high shelf or in the back of the closet. I decided to look for something that we could display in our home after the fact so that we can be reminded of our wedding day and our loved ones every day.
One of Nick and I’s favorite outdoor activities is floating. We have already incorporated this shared hobby into our wedding day by using a canoe as a cooler for our non-alcoholic beverages. So why not get wooden canoe paddles to have our guests sign? This will help tie in our outdoor adventure themed wedding and can easily be hung on a wall and displayed in our home.

Dress Fitting Day at Joon Bridal

Nick’s Suit Fitting at Men’s Wearhouse
Alterations & Final Outfit Fittings
One of the more fun activities this month was picking up our wedding attire! I finally got go back to Joon Bridal and try on MY DRESS! This was definitely one of those reality check moments when I realized “This is really happening, this is really my dress!” While the dress was made to my relative measurements, they make wedding dresses to the closest size, not to your specific measurements. That means everyone, and I mean everyone has to get alterations on their wedding dress. So don’t be discouraged if you have to get something taken out or taken in.
Nick’s custom suit was also done about the same time as my dress so he also got to go try that on at our local Men’s Wearhouse. He also needed a few alterations done. These alterations are one of the reasons we chose Men’s Wearhouse for his suit because unlike my dress alterations, his suit comes with free alterations FOR LIFE!
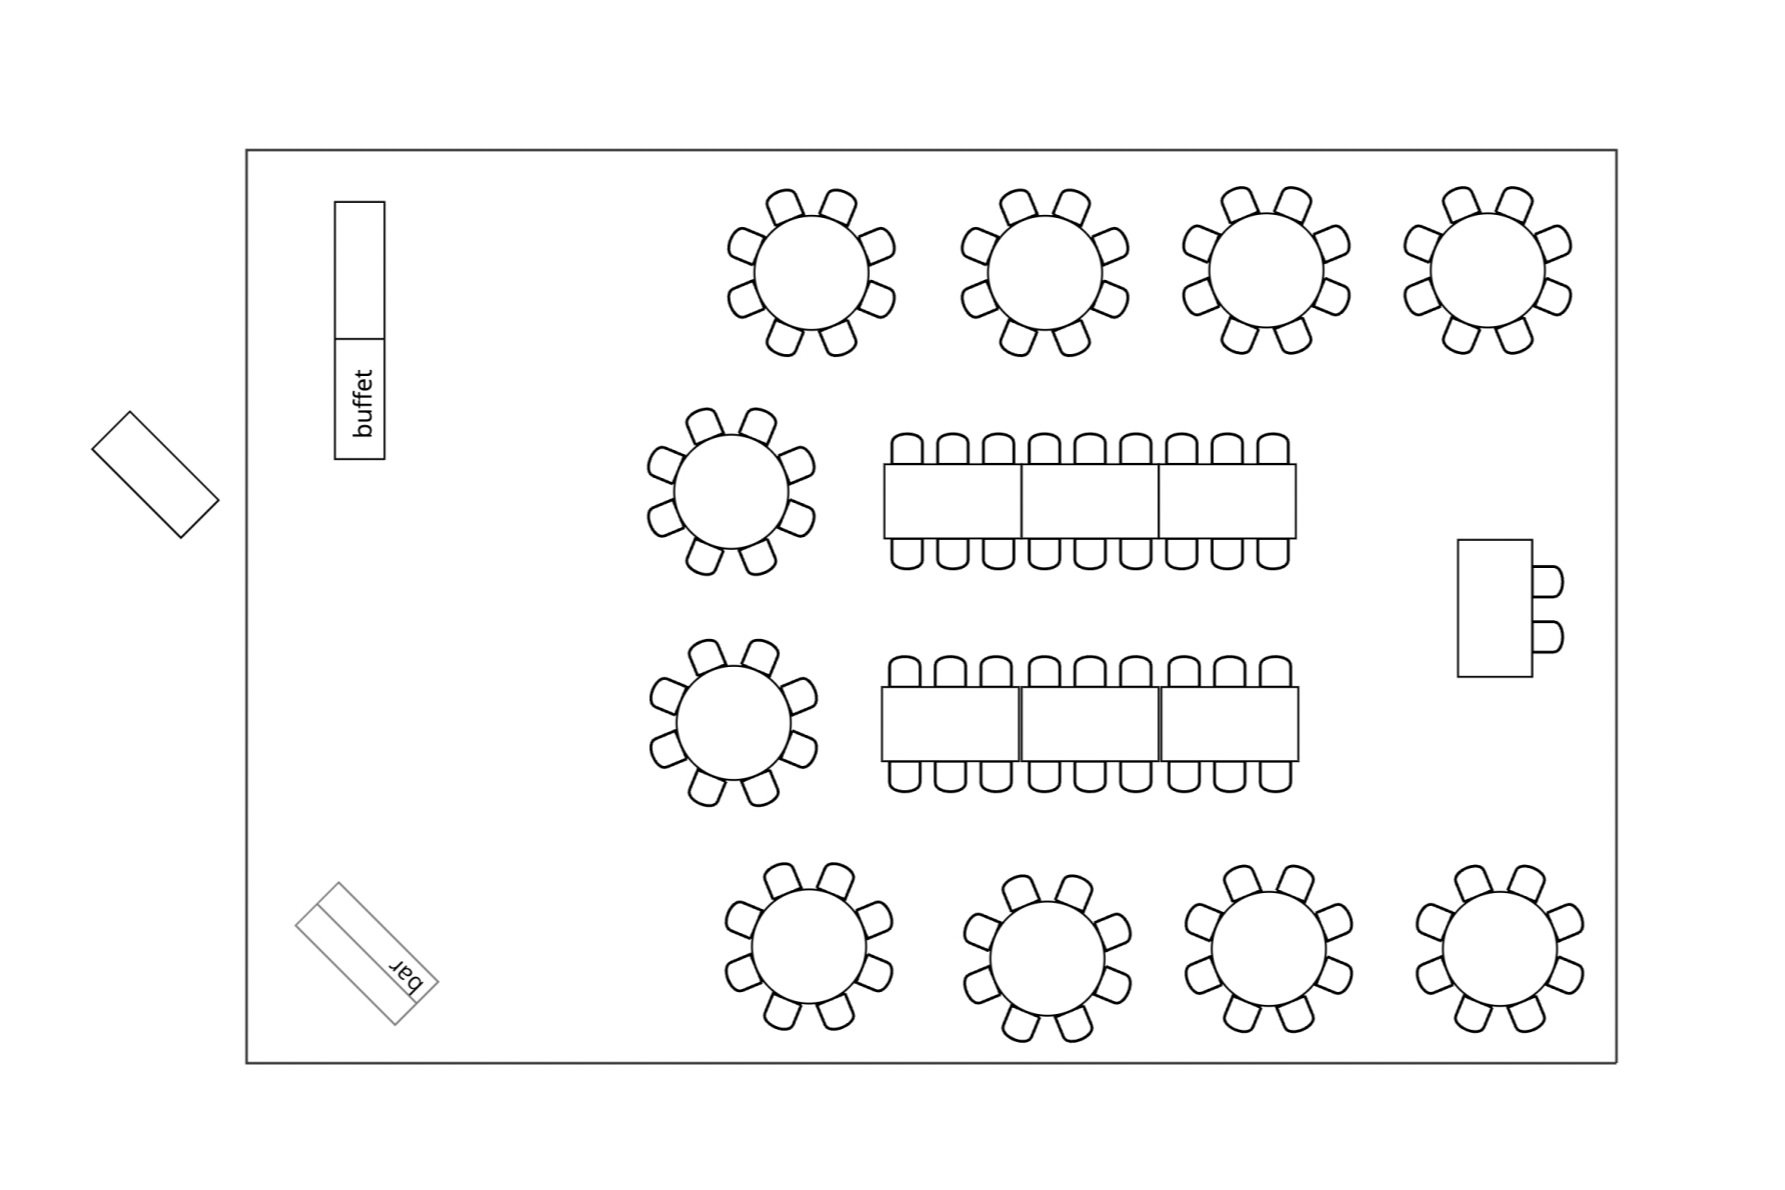
Our actual floorplan made on Allseated.
Floorplan
There are a lot of creative and fun parts to planning a wedding, and then there are the more detailed logistical parts. Creating your wedding floor plan is one of the more logistical to do list items. It isn’t really fun, but it must be done. When it comes to creating a seating chart, there are a few ways you can do it. You can get out a pen and paper and draw your circles to represent tables. If you’ve seen New Girl at least once, you also have seen Cece and Schmitt’s process where they get a poster board and use paper tabs to move their guests around. Both of those are decent options, but I’ll let you in on a little secret. There’s an even easier way that ensures that you actually utilize your venue space and have room for all of your guests.
Most wedding venues have uploaded their floorplans in at least one online program like Allseated, Aisle Planner, BeMerri, or Social Tables. These programs allow you to place tables in your event space, select the number of chairs at each table, and even upload your guest list and assign guests to a table and a chair. But most importantly these programs allow you to see your event space in a true to scale rendering. Our venue didn’t have their floorplans uploaded into any of these platforms, and that's okay. I used Allseated and created a custom floorplan for our 40’x80’ tent. Using Allseated made this logistical task go by so much faster, and I know that everything will fit under the tent!
Our wedding is in less than 20 days! We are finally in the home stretch and are so excited for October 7th. Thank you so much for following along on my wedding planning journey. This has been a very exciting time of our lives full in anticipation for the next phase to start together. While this was the last full month of planning there are still things on our to do list before the big day comes. Subscribe below to get a reminder for next week’s post about what else we’ve been up to. If you have any questions about wedding planning and how I’m planning my own wedding, leave a comment below.
Cheers,
