Month Four: Wedding Planning with Maddie
This is the sixth post in a new series about me, a professional wedding planner, planning my own wedding. If you’ve been following along on the blog, or on Instagram, you know that back in March, I got engaged to the most amazing man that I know! It has been a very busy and exciting last few months. With three years of experience, you would think planning my own wedding would be a breeze. This month things got real. Up until now wedding planning has been dreaming, romanticizing, and even manifesting our wedding. Once we hit that 2 month mark till our wedding, it stopped being a dream and became a reality. I’m going to be honest with y’all this last month is where it started getting hard. Not only did we move, and start new jobs, but during this time we had to make some hard decisions when it came to budget and guest count. I also started a lot of DIY projects that have begun to take up a lot of my time. I really started to feel like things were going too quickly and the to-do list was way too long. Here are a few things we did this month to tackle that to do list in the final months leading up to our wedding:

Send Save the Dates
At the beginning of Month 5, with 2 months left until our wedding, we sent our Save the Dates. We made the decision a while ago to send out electronic Save the Dates to the majority of our guests. This allowed us to save some money, avoid shipping delays, and prevent guests from misplacing them. I designed our Save the Dates on Canva using photos from our proposal in Colorado Springs, and gave it a postcard aesthetic. Nick and I both share a love for traveling and our proposal at Garden of the Gods will always be a special moment for us. It was actually Nick’s idea to incorporate Garden of the Gods into our Save the Dates. You can shop our wedding Save the Date design and others by me on me Etsy shop MNicholeStationery.
We looked into a few different online invitation options like Evite, Paperless Post, and Greenvelope, but we didn’t want guests to be able to RSVP just yet. Ultimately we decided to have a few of the Save the Dates printed for our family members, bridal party, and ourselves, while we sent the rest of them via email. While this is not very traditional, we did have a short engagement period and had played with the idea of not sending Save the Dates at all. Sending out the date and a bit of information about our wedding via email allowed us to give some of our guests, particularly the out of town guests, a heads up so that they could begin to make their own plans to attend our wedding.

Wedding Save the Dates designed by MNicholeStationery
Pick the Guy’s Suits
Nick had decided early on to have the guys all wear dark navy suits. When it came down to deciding where to rent the guys suits, we decided on Men’s Wearhouse. This was an easy decision for us as they had storefronts located near all of our family and groomsmen who would be needing to get fitted. We went to our closest location and spent almost 2 hours there deciding on our bridal party attire, and making selections for a custom suit for Nick. This process was a lot of fun, and there were so many options from the shape of the pockets, liners, buttons etc.
We were given a group number when we registered and were able to send an email to each of our groomsmen, ushers, fathers, and even the ring bearer. It provided them with the instructions on how and when to get fitted. I was even able to log in to our group on the Men’s Wearhouse website to track each of their progress to see when they had been fitted, ordered, and picked up. This really put my mind at ease and I didn't have to constantly ask Nick to check in with the groomsmen.

Some of my Wedding Inspo From Pinterest
Inspo for our rehearsal dinner from Pinterest
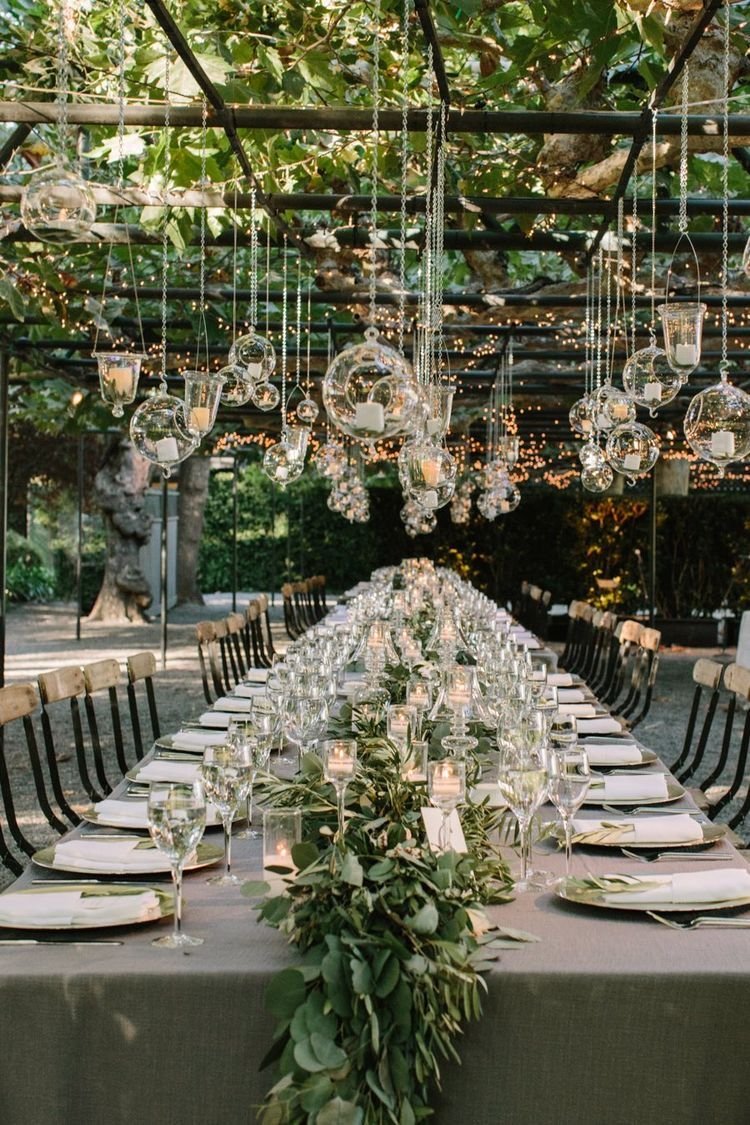
Table Design
Creating the aesthetic and design theme for our wedding ceremony and reception was fun. I spent a lot of time on Pinterest looking at “Green Wedding Inspo” and quickly decided on what I liked and what I didn’t like. I realized very early on that not all greens look good together. You can set almost any two shades of pink next to one another, and they will look good, but the same is not true for greens. Some greens have strong yellow, blue, or even brown undertones. These shades do not look good next to one another, and it became very important to me that all of the shades of green mesh well together. I ordered 6 different kinds of napkins and table runners until I found the one that didn’t clash with the bridesmaid dresses. I carried that dress swatch from Azazie with me almost everywhere when I was shopping for our wedding.
Once I settled on the greens, I moved on to different textures. With our love for the outdoors, it was very natural to plan for an outdoor venue. Incorporating wood textures was an easy decision. I found some dark faux wood chargers at Hobby Lobby that I fell in love with. Unfortunately you couldn’t order them online. We began stopping at Hobby Lobby every chance we got and completely buying them out until we had all 145 that we needed.
I also knew that I did not want anything gold at our wedding. I do not wear any gold jewelry and both my and Nick’s rings are White Gold. We decided that everything at our wedding would be either White, Silver, Wooden, or Green. This allowed everything to look more consistent and intentional throughout our event.

Inspiration for DIY Bar

Inspiration for DIY seating chart
DIY
With only 2 months left until the wedding, it was time for me to get cracking on the DIY projects. I have been crafting my whole life, so when it came to planning my wedding, I knew I’d be embarking on a few new projects. Some of the projects I have been working on are: Favors/Name Cards for our family head tables, Bar Signs, and a Seating Chart display.
We decided not to buy favors for each of our guests because I have been to way too many weddings where over half of the favors were left behind or thrown away after the wedding. We didn’t want to waste any of our wedding budget on things that were going to be tossed right after the wedding. Even though we had decided against favors, we wanted to do something special for our families and bridal party to thank them for all of the support they have given us throughout our lives and relationship.
When it comes to our signage, less is more, but there are a few signs you really can’t go without. We are doing two custom cocktails at the bar and creating a sign that displays everything stocked at the bar. Details about our cocktails were important. We have a lot of fun going to craft breweries, drinking local, and making fun cocktails for each other at home. We knew a unique bar had to be incorporated into our wedding. As some guests may not know about the craft beers or cocktails, I created a sign to help them order drinks at our wedding.
I also made a seating chart to help our guests find their seats. We decided to assign them to tables rather than specific seats. My dad and I created a seating chart out of old windows from our home. Our family home is in the historic district and has been passed down generation to generation, so it was really sweet to use something from the home into our wedding.

Order Invitations
Nick and I picked an invitation suite from Minted. I really wanted a letterpress invitation because I think they are so elegant. I strongly believe that the invitation sends a huge message to your guests about what type of event you are planning. The details and aesthetic of the invitation will give them a few clues about the formality of the wedding and also the attire or dress code even if it isn’t stated on the invitation in wording. We picked a green letterpress design with mountains, water, and florals around the border to stick with the outdoor theme. If we hadn’t found this design, I probably would have opted for a custom Minted design, but this one was just perfect. In addition to the invitation, I also ordered a details card to share more information about our wedding including dress code, how to RSVP, our registry, our wedding website, our Plus one policy and our children policy. I wanted our guests to have all the information they needed once they opened their invitations. I also uploaded our guest list and addresses to have the addresses printed on the envelopes. This is a free service offered by Minted and it saved me so much time down the road when it was time to mail the invitations.
We also desired to incorporate wax seals and vellum wraps into our invitations. I opted to do these myself rather than order them through Minted to save myself a bit of money. I ordered the vellum wraps on Amazon here and they were the perfect size. For the wax seals I ordered a wax seal gun, green wax sticks, and a custom seal with our wedding crest on it from Artisaire.
While this month was hard, we got a lot of wedding tasks accomplished and I could not be prouder or more excited for our wedding. Thank you so much for following along on my wedding planning journey. This has been a very exciting time of our lives full of family, friends, and anticipation for the next phase of our lives to start together. This was just one month, and there are still so many decisions for us to make before the big day comes. Subscribe below to get a reminder for next week’s post about what else we’ve been up to. If you have any questions about wedding planning and how I’m planning my own wedding, leave a comment below.
Cheers,
